Saturday, December 13, 2008

Online Application Demo Using WebCamMax

I have just set up and used WebCamMax to stream my desktop screen up to ustream. I found the application to be VERY easy to use and very intuitive. I needed something to do demonstrations of applications that I use in wood working. I use SketchUp for setting up and dimensioning my designs and to accurately get all my angles and measurement in almost like a blue print format.

I brought this application to the notice of some of my wood working bretheren at TWW but many people didn't understand it use, thought it was too complicated, or, for the most of them, just found that there wasn't a fast way to learn how to use it. They asked if I could do a demo of it so they could learn a bit. Slight problem, unless I turn my camcorder on my laptop it couldn't be done. In steps WebCamMax.

The installation of WebCamMax was very smooth and as it launched I didn't bother to set the program as defaults to anything because I didn't know whether the program was going to be worth it or not. I quickly found that it was a great asset to use.

I really didn't get into the bells and whistles of the application, the effects, the masks, and the like. I wasn't really interested in that. But I found the ability to either do Full Screen, a Selected Window, or a Selected Area to be a very useful tool. Also it allows you to integrate audio into your video stream to ustream. This is a great plus when you are streaming to chat room of 20 plus people all posting question upon question about how and what you are doing.

Unfortunately, ustream is still the biggest bottle neck in the process. Ustream has a limitation of 640x480 resolution. A lot of the detail of your desktop is lost because of this.

The pricing is reasonable but odd. There is a 6 month license for $20, 1 year for $30, $40 for 2 years, and $50 for a lifetime license.

I did have one issue that I am going to put more on vista's head than WebCamMax's. Once I started the application and brought up ustream, if I changed any of the settings in WebCamMax, first ustream would lock up, then WebCamMax, then Firefox, then vista. All ran great until I altered the way that WebCamMax was streaming to ustream, switching camera feeds, adding audio components, or manipulating the feed amount. After that it was a slow degrade to system failure. Not even a Ctrl+Alt+Del worked or would allow you to close out the failed app and the only way to recover was a cold forced shutdown. As of the time of this writing vista has so many issues that it should have never been released, and I am saying this as having been a computer engineer for more than 20 years.

LQQK

*****UPDATE*****

Take everything I have said in this posting and throw it out the window. Thanks to Nicole Spagnuolo, wife of the famous and world reknown Marc Spagnuolo (aka The Wood Whisperer)and fellow wood turner, I have found da bomb in desktop sharing. My new application of choice is YuuGuu, http://www.yuuguu.com. The reasons for this are as follows:

  1. It is FREE! (always #1 on my list, if applicable)
  2. The client is relatively small and doesn't max out the CPU on most up to date systems.
  3. The viewer side is web based. This means that it is open to all platforms with no viewer side dependancies (except for maybe flash).
  4. It is secure. The "broadcaster" must have the client running and must enable sharing. The viewer must go to a known URL and enter in that broadcaster's PIN. It is then up to how the broadcaster setup the client as to allow with access with or without authorization.
  5. You can set it up to connect with all the major (and even not so major) Instant Messaging clients (Yahoo, MSN, ICQ.....)
  6. It has it's own chat window.

A GREAT tool for anyone wanting to demonstrate computer based graphical real time information.

Saturday, October 25, 2008

Compound Angle for the Drill Press

Once a while back I was really into making rocking chairs. Although I would really like to make more of them but my focus has temporarily gone elsewhere. Well, some of you know me from my time in the TWW Chat Room and the forum there, well I can be a little.....precise.....anally so at times. In drilling the holes for the spindles and legs I made a slight discovery, compound angles are a pain to drill on a drill press with a table that only tilts left and right.


I did find an answer, though it lead me back to my high school Trig books. Ok well it lead me to Google where I refreshed on sine, cosine, and tangent. I always forget sine is adjacent/hyp, or is it opposite/hyp. I know it isn't adjacent/opposite, because that is tangent, or is that opposite/adjacent. Crap, now I have to reGoogle again:


Sine:
Sin A = opposite/hypotenuse
Sin A = a/h


Cosine:
Cos A = adjacent/hypotenuse
Cos A = b/h
Tangent:
Tan A = opposite/adjacent
Tan A = a/b


Then I thought to myself that when all is said and done a compound angle is just two angles in a rigid 90 degree plane. Well instead of two angles in planes that are 90 degrees off (7 degrees to the left, and 10 degrees to the rear), why not use one angle that is based on another angle. It actually works, but takes a bit of computations. Instead of measuring an angle back and an angle off to the side, all from 90 degree axises, you can measure one angle off 90 degrees from dead center and then measure the actual angle from that point. Well that can be a royal pain to figure out.....but I did it the first time though.

Then I went to my SketchUp book of tricks to come up with a better solution. Always a better way, right? Well a 1/4 sheet of Ply or MDF and 18" of piano hinge later I had my better way.

Now unfortunately for you the reader I have already made mine. At some point I am going to blog a project as I make it and you'll get more play by play photos. But it is all pretty simplistic and the SketchUp drawing that you can download should give you enough insight to make your own with little difficulty. But you do have to be precise.

Unfortunately there is no easy way to calculate the angles. Grab a calculator. Use the 8" from the hinge pivot to the inner inset in the equation: Tan(desired angle) * 8" = measurement from the bottom of the inner inset to the lower table. From there you are going to need to either convert to approximate fractions, generally to the nearest 1/16" or at most 1/31", or just use the decimal values.
To reduce the number of times that you have to do this you might want to mark the common angles as you calculate them on the side. To download the SketchUp model click the below graphic.

The first step in this is to cut the top and bottom tables. Simple enough, the top can be whatever size is needed for your situation. I used a fairly large table of 24" x18" . But if you alter the distance between the pivot point (where the hinge is) and the inner cutout section you will need to adjust the above equation: tan(A) * 8" = lifted distance, where "A" is the desired angle. Get it? It's really not that hard if you have a calculator handy. You are also going to need to adjust the lower table size so try not to make it too hard.

Next on the list of things to do is the smaller table that will fit onto the drill press table. This will need to be about 14 13/16" long and 18" wide and it helps a lot if it is a perfect rectangle. If you make a wider table you may want to widen this, if you make a narrower table you are going to need to reduce the width. The idea is to not have the lower table too narrow that you need a flashlight to see your settings and not too wide to prevent you from lets say clamping your work piece down on the sides. This section you are going to need to align perfectly parallel to the drill press table's back edge. But when you align it leave room to see the angle dial of the press's table. You are going to need to bolt this section down. Mark, drill, and inset holes for bolts and washers to hide flush to the top surface.

Then check your piano hinge for its thickness and depth, and create a rabbet on the front edge of the top of the small table. Alternately you can reverse the piano hinge and fix it to the front edge of the board, this would probably be a preferred method but one that I didn't put in the SketchUp plans. Using this method would depend on the depth of your piano hinge. If, for example, you have a piano hinge that has the holes set at 1" from the pivot point, this isn't going to work on a 3/4" table unless you drill more holes. But if your piano hinge is only 3/4" in depth and the holes are about 1/2" out you're good to go.

If you have followed the plans religiously (small chuckle inserted here) you should be able to find the center of the inside edge of the top and bottom tables (the edge that is going to be closest to the drill press shaft). Mark and line them up, then carefully arrange the tables to mark the holes needed to affix the top table to the hinge. I found that carpet tape works great for this. Drill pilot holes for the screws and permanently mount the two tables together.

Now we are getting good. The last piece you are going to need to cut are the sides. I did this out of two 10 1/8" x 12 3/16" pieces. The best way to explain this puppy is to download the model, you'll get the idea. Download from here. Essentially, on the 10 1/8" side, draw a line 1 11/16" in. This line will reference both your pivot point on the hinge and the start of your arc.

From the point where the line insects the bottom of the piece, mark 2 1/4" up. This will mark the starting point of your arc cut. From the point where the line intersects the top of the piece, mark 8 1/4" out and 1/4" down. This will mark the ending point of your arc cut. Mark lines to outline a 1/2" wide arcing cut from one point to the other keeping the 8 1/4" radius throughout. Then cut the arc using a 1/2" straight bit with a router (for you galoots out there, time to dust off the coping saw). Don't forget to keep 1/4" of the piece at the top for stability and 1 11/16" at the bottom. And the last step is to cut off about a 10" from the bottom to the top. This is just to get added material out of the way. Do this for both side pieces.


From here it is just assembly work. A carriage bolt and wing nut on both sides to hold the angle. Cut or route a recess for sacrificial inserts plus some mounting holes to the drill press. Maybe add a T-track.

I think this will give you the general idea and a starting point to add your own spins on this. Mainly it is all in the plan and time on this is about to run out so I am hitting the Post button.

LQQK

Thursday, June 19, 2008

Wicked Edge on a Chisel

This has been a long time coming, I know. Wasn't my intent to leave this alone for so long. Well anyway, on with the info.
This is actually an add-on to the previous post of Sharping Perfection. I am still
working on gouges, they of course are a little tougher given their curve. But at this point that isn't a big issue since I don't do much carving. I do a bit of turning but turning chisels don't require the highly polished bevels that are required in carving, finishing, mortise, and other works.
This is by far the best honing process that I have found so far for not so curved blades. It will bringing two edges to a brightly mirrored polish without reverting to buffing wheels which, if you follow the physics of how a buffing wheel works, tends to round over the cutting edge while it polishes the bevels.

(I use the term "blade" to cover all pieces of metal to be honed and polished whether they be plane irons, chisels, gouges, etc.....)

The Strop:

First, start with a flat piece of plywood, a scrap piece of cabinet grade of course works best. Cut the 3/4" ply into a decent sized rectangle, the size of course going to vary with the next item, a square edged belt. You know the type I am thinking of, think 1950's Levi's black belt. Belts with tapered edges aren't going to work too well and belts that have edge stitching aren't going to work at all. Used belts work fine as long as they can be made to lay perfectly flat. NOTE: You are going to cut the belt into at least two pieces; so if your belt has that little section in the back that curls you can cut that piece out. The way I cut my belt was in thirds. I used the piece with the holes as well but cut that section in roughing half to avoid the hole indentations.
Next I put a double coating of spray adhesive onto the face of the plywood following the directions on the spray can for additional adhesion. I then sprayed a double coat on the belt sections on the rough side being careful not to over spray onto the edges of the leather, important you want the smooth side of the leather to be the stropping side. Carefully place the leather onto the plywood being sure to fit it right the first time, if you have to reposition the leather it may weaken the bond to the plywood. Press it into place and apply pressure until it sets up. The Strop is done.

The Honing Compound:

I have used black (or gray) honing compound also known as Emery. This stuff is the course stuff. If there was a honing compound for power stripping varnish off a foot locker, this would be it. This stuff in like Lava hand soap for hands. In fact I wouldn't be surprised if it was made with lava. It is good rough honing or light metal removal, but NOT for polishing or final honing.

Red honing compound, this is more for jewelry, silver, gold, platinum, etc..... It is the finest of the honing compounds but it doesn't have the cutting power to deal with steel, especially tool, hardened, and high carbon steels.

Tripoli Brown Rouge, can be used on a lot of things aluminum, plastics, copper, zinc, and even wood. I don't really get the buffing wood part, well maybe exotic oily woods. But again, not for wood working tools.

This brings me to Green. This is the most widely used for tools. The particles are in the .5 to .7 micron range (1 micron = 1 micrometer or 1 millionth of a meter). This is great for almost all tool applications.

Then there is my new favorite, White honing compound. These particles are less than .5 microns.

The process is simple. Once you run the blade through the stones (even up to 8000 grit) or sandpaper higher polishing can be attained by the use of honing compounds, like diamond paste but much less expensive. The honing compound is rubbed into the leather and adheres partly due to the wax, or sometimes grease. The particles embed into the leather and are instantly ready to polish the two sides of the edge.

The polishing can take an edge like this (which is a LN blade only slightly used):

And turn it into something like this:


The idea is to first use a high grit, to remove nicks and square up the blade. Then to work up the grits, higher and higher removing only the scratches the previous grit left. You can go a little over board on the number of stones you go through. Generally a 220, 400, 1000, and then 8000 can be sufficient, but some, like me, have a more varied set that really isn't required. After the 8000 grit most would consider things done, and they would generally be correct. But there is something I get from the feel of a plane or chisels sliding and slicing through wood and lifting shaving off like this:

The bottom shaving is from my Lie Nielsen #7 right out of the box. The one on top is after sharpening the blade and chip breaker to the picture above. SWEEEEEET. Like mosquito wings.

LQQK

Wednesday, February 27, 2008

A Journey Towards Sharpening Perfection and the WorkSharp 3000

Note the title is "A Journey Towards", coming closer and closer to attaining it, but knowing that it isn't possible.

Ok, after seeing the flame job that The Wood Whisperer's, (Marc Spagnuolo's) review of the Incra fence system wrought "I swore I would never.....blah, blah, blah, blah, blah." Yeah, didn't take me too long to get over that. I have to be smarter than this. Ok, I am; but I am also one to point out flaws where I see them too. Well, maybe not flaws, but definite room for some thought out improvement. People may think I am anal retentive, OCD, ADD, Asperger's inflicted, or someone who just likes to picks apart every ridiculous thing with little comprehension of reading the instructions first. Well to them I say, "I do to read the directions first! Very nice pictures."

That being stated, I must also fill in a little background. I am one of the insane type who actually likes to sharpen tools. There is something "meditational" and Zen-like about the path to having two shiny mirrored surfaces merging to a straight or curved line in a precise flat plane. It is beautifully mathematical too. Then there is the great pleasure in taking the sleekly made razor and sliding it through wood fibers, neatly shaving or chopping them to desire without deforming their neighbors.

If you want to blow off the my personal history of sharpening click here. But I'll be hurt and you'll be cursed with 7 years of rusty tools.

I started off using oil stones; when I was first learning the difference between a chisel and a screw driver with a sharp edge. Why, you might ask? So did I. It was what my father used on his pocket knife; and I, for another brief moment in time, was an idiot. I tried sharpening chisels and jointer blades with them, both with too much work and not enough quality results. Oil stones suck. NEXT!

After that I started looking around, unfortunately it was at the "big box stores". I figured that I would have to have a grinder to make hollow bevels, right? So I went out with little money, and littler sense, and picked up a Delta high speed grinder with no speed control. I even went so far as to buy the softer, finer grit stones to grind without glazing and trashing the tool in the process. Strike two, ok maybe still strike one; it does still come in handy as a buffing wheel, but with a stone in place it really shouldn't be used on a chisel or any other blade without a fire extinguisher and a bucket of water handy. NEXT!!!

My third venture was the Delta Sharpening Center 23-710 with the 23-715 extra long planer blade holder, things were starting to look really good. It has a 120 grit dry wheel which spins at about 3,600 rpm (still not a good speed), and a wet 1,000 grit wheel that spins at 400 rpm. This one was very nice, but the quality control on it was a little sub-par. Really I have only three issues with it.

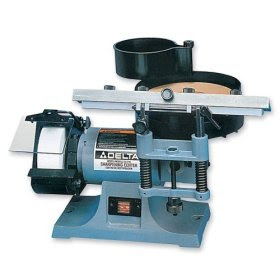
  • First, the tool rest alignment design doesn't allow for slight adjustments the angle of the plan that the tool sits on. Mine was off, or not co-planar, with the large 1,000 grit wheel to the tune of about 5 - 8 degrees. This made my tool rest very "askew" and so my edges.
  • Second problem was that I still wasn't able to do gouges very well without causing hideous grooves in the soft 1K grit wheel; which I would have to then flatten out, wasting a large portion of the stone.
  • Third, the dry wheel spins far too fast and would still burn edges if I wasn't closely watching. Really not that big of a deal, but the real issue with the 120 grit dry wheel was that it is hollow in the center. It is bowl shaped. If you don't monitor the thickness of the wheel from the inside bowl to the outside edge there is going to come a point where centrifugal forces are going to cause it to fly apart and put out an eye.
Fourth on my list and still one of my favorites and most used, the water st
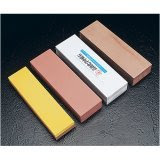
one(s). Water stones cut the fastest, safest, and are the most accurate honing systems you can buy, with the right guide of course. Now before I start getting "using a guide ain't the real man's way of sharpening" guys on my back; reread the second to the last sentence in the first full paragraph. When I read and hear that the optimum plane iron sharpening angle is 27 degrees for a low angled block plane, guess what I am doing. I pull out my beloved Veritas Mk II, sharpen to 25 degrees, and then put a micro-bevel of an extra 2 degrees. That's the way I roll. If I don't like it, I modify; if I do like it, or if I don't notice more than a slight negative difference, I stick with it.

There are some real down sides to water stones I will admit:
  1. They can be expensive, very expensive in the higher grits. A 15K stone can have a price tag in the hundreds of dollars.
  2. They can be messy. They are generally soaked and then at least sprayed frequently with water to help remove the used abrasive and metal.
  3. They can be a royal pain in the ass to keep flattened. A good machined granite slab with sand paper can flatten all but the coarsest 220 grit bricks. For that type you need a special flattening stone of silicon carbide for that beast.
  4. Irregularly shaped chisels and gouges (especially of the turning variety with their long handles) can be very awkward to do and they generally produce nasty grooved that must be reflattened, unless of course you spend more mullah on stones made for each shape.
  5. They can be messy (I think I got that one), 6), 7), etc.....add some stuff I am sure you have your own list but that is my 5.

But even with these issues they have equal benefits to counter balance, respectively:
  1. A good balanced set, used properly, can last you many many years.
  2. The "messy" water traps 100% of the metal "filings" or dust and contains it for controlled disposal, also you are ensured that you have a clean fresh path for the best sharpening.
  3. Ok, they can still be a royal pain in the ass to keep flattened. But it isn't that bad, especially if you have a granite slab and good sand paper.
  4. Once flattened they are superb at truing, honing, and putting the brightest mirrored surface on any regular chisel, plane iron, planer or jointer blade.
  5. Ok, it is messy but with each pass you get a good clean set of abrasive material to bring out that dazzling shine and better-than-razor sharp edge, and you don't have to keep a piece of rubber handy to clean it like sand paper. Not to mention that you also are generally going to have the mess contained in a water bath.
At some point I want to try ceramics, but from what I have seen they are more expensive and harder to clean and flatten (although I have heard that it doesn't need to be done that often) than water stones.

Fourth and a half, I have tried sand paper on my granite slab. And it does work great, for truing and tuning planes. The three biggest issues I have with sand paper is; that once you start getting into the finer grits (anything below 320) the metal starts to cake up after just a few passed. You then have to brush, rub, scrap, and knock off the metal "crusties". Now, while yes you can use water at that point to try and lift and remove the metal dust, it is still a mess and you have to constantly reach for the spray bottle. If you keep the coarser grits dry to ease the mess you still have a lot of nasty metal dust. And the last is that you have to special order grits higher then 1500 to 2000, and even grits past 600 you can usually only get at decent auto parts stores. Oh, and they rip. And, oh, oh, and they have a relatively short shelve life. Generally it is recommended that you toss the paper backed sand paper after about 6-12 months, used or not.

Now the last one. I know; you have been patient and hopefully this won't be a total wet blanket.
The WorkSharp 3000. TaDaaaa!!!!!


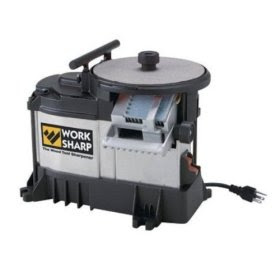
I have run this through a long several nights of tests, not weeks or months, with most of my chisels, blades, gouges, and others; all except for my jointer and planer blades. The jointer blades I am sure I wouldn't be able to do with this system because they are just too long, a little over 8". Same issue with the planer, but the planer's blades are more the disposable type. For both of these it is going to be sand paper, water stones, or most likely the Delta Sharpening Center. After all, I did buy the extra long holder, and with proper flattening and patience it does the best job, at least down to 1,000 grit.

I have studied it, I have tried to analyze it with my usual needs from a sharpening system. I turn, I chisel, I do some carving, and I love me a good sharply tuned hand plane, and I think that this report will cover all the bases I need to cover. If not, I am sure someone will let me know. I have shared these with Marc Spagnuolo and hopefully he'll see fit to edit them up and share with others on his site. (Like Marc, I am only Joe Blow and not a paid technical reviewer with weeks to dedicate to "testing" stuff, which is a loose term in itself. If you don't like what you read, suck it up, spend your own $200, and write your own.) Here is the self-edited version of what I found:
  • The sand paper clogs too quickly, even on the coarser grits (the grits with the lowest numbers). They have to be cleaned constantly with the supplied rubber block cleaner to be effective. Also you have the ability to sharpen under the disc with a 5 degree incremented tool rest. In order to properly clean the under side of the disc you have to take the disc off, real pain.
  • Speaking of taking the disc off. When you apply pressure to the disc, and the disc is spinning, it causes the hold down bolt to tighten. You would be surprised how a little drag on the outside of a 6" disc can transfer to a LOT of torque on a center bolt. I wore my hand red several times getting the bolt loose. Maybe a bigger handle on the retaining bolet would help a lot.
  • The coarsest grit that is provided isn't coarse enough for moderate metal removal. It is great for light metal removal, honing, and finishing to a near mirrored surface; but if you are looking to flatten the back of a wide blade that is fresh out of the box, or damaged, you will need to buy a coarser grit (like a 100 grit paper) to start with.
  • The sticky backed sand paper is prone to air bubbles which is a leading cause of sand paper blow out. This at least can be corrected by using a needle to open a passage for the air to escape through the paper. This is a huge issue especially for the finer grits.
  • The only positive angle stops are at 20, 25, 30, and 35. This is good for basic sharpening, but you are unable to get that 1 to 2 degree micro-bevel that I have been spoiled into getting with other devices. You can get a very decent 5 degree micro-bevel on the first three angles by setting it up a 5 degree notch though.
  • The ring that surrounds the spinning disc is made out of aluminum. This means that it is not conductive to magnets. It would be of great help to be about to attach magnets to the ring to attract some of the metal dust that is flung off the disc.
  • The metal dust is an issue. With the WS3000 it is flung everywhere. One of the best and worst things about water stones is the water/slurry that is made during the sharpening process traps the metal "filings" or dust that is made, bonus for them; but the negative side of the coin is that it is sloppy and a wet mess afterwards.
  • With the top rest that can be used, that can also be mounted under the disc, for free hand sharpening there is no angle indicator. Ok, I hear the "but that is what free hand sharpening is all about." Well that is fine, but there are many times during my sharpening experience that the iron (that is what the blade of a plane is called) is pulled or jerked to the side. This throws off consistent sharpening. It would be good if they provided at least a registration plate to slide on to the tool rest, like a wide tight fitting washer that could be used to make sure the blade was perpendicular to the disc while sharpening, if it was desired.
  • Another slight issue is that unless you are going free hand you are limited to a 2" blade. That means that any plane blades over that and you are hosed, this includes #4 1/2, #5 1/2, and up. But look toward the bottom for a trick to over come this short coming.
Now I am not saying that the WorkSharp is a not worth the $200 price tag, far from it. These are mostly just FYIs and notes that I hope they'll read and put into the WorkSharp 4000. And if they do I hope they will keep me in mind for product testing or at least a freebie for my input. Besides it has many pluses and is the single greatest all around sharpening system for the beginner:
  • You can basically use any 6" PSA disc (PSA is the sticky backed type) on the system. As long as, of course, you punch a 3/4" hole in the dead center. And you can get those at any hardware store, but it is generally not possible to find the higher 1000+ grit variety. So for those you are going to have to go to WorkSharp; or MAYBE a higher end auto parts/painting place or the Internet or maybe make your own. A great thing because, again, you can get 100 grit discs for the more hard core metal removal if you really toast a blade.
  • Another one for the plus side is that sharpening gouges is great. The view-thru wheel is wonderful for irregular shaped blades that you need to watch as you grind. Although you still need to deal with the free handed idea that you can't set a stable angle without some practice, the tool rest can be mounted on the bottom to help with any blade. This is where this system shines. With stones and every other sharpening system I have used, outside of MDF and a molded contour with embedded diamond paste, this is the only system that truly allows you to effectively manage the shape and angle of the edge. By being able to actually look through the wheel you are able to hone an edge without wondering if I am bluing the edge or grinding it past the point of effectiveness.
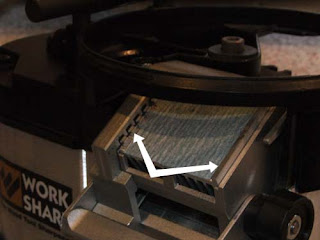
  • The aluminum flat tool rest for chisels and smaller plane irons acts as a decent heat sync to try and circumvent overheating. Trick Notice (click image right to enlarge, sharpening disc removed for clarity): The registration guide can also be moved further to the left than documented it expose a "corrugated" edge on the left. This does make it possible to sharpen blades a little beyond the 2" limit with proper registration; but since the blade is off the aluminum heat sync backing, you must be careful not to blue the edge.
Although I have pointed out some nit-picky details that I would like to see upgraded or at least optional, I like the unit as a whole. It is a great starter sharpening center for any turner, chisel or plane jockey, or gouge monkey that isn't going to count on it to sharpen jointer blades or need hollow bevels. But it is just not the end all be all, and people shouldn't look at it like it is. No sharpening set up is. They all have their own negatives and positives.

I wouldn't toss my 120 grit small grinding stone on my Delta sharpener, it is great for hollowed bevels. I wouldn't toss my stones either, they are outstanding with my Veritas MK II guide for accurate angles and micro-bevels of 1 and 2 degrees. And I'll even keep the Delta high speed grinder, just using the felt buffing wheel, maybe even the softer bounded aluminum oxide wheels.

LQQK

Saturday, February 9, 2008

LordLQQK: The Wood Bender

There are times, and many more situations, where you need to bend thin strips of wood to do your bidding.

One of my numerous projects is violins, shaker boxes, boomerangs, ok.....wait a minute I did say one. Ok, lets stick with violins. Along with the long hours that are spent on the faces and backs; planing with finger planes and scrappers, and gingerly shaping the thin quarter sawn spruce, there is the shaping of the ribs, or the sides.

Now there is a specialty iron that is used just for this bending, but that is about all it can be used for. If you want something wider or just bent differently, it is kind of a "one trick pony". That isn't a bad thing if that is all you are doing. But since I am rarely asked to make violins and I have other interests than "luthierism". I needed something that is going to do more than just make violin ribs.

Without going into a lot of detail on how to actually make violin ribs, which isn't the point of this, I would like to go into the details of the bending process. I prefer to use a propane torch shot up various diameters of pipe. For very tight bends a 3/4" galvanized gas pipe is ideal.

First thing I need to cover that this does use a flame. Great care must be used: proper ventilation, heat protection for the work surface, proper flame setting, proper equipment, and heat control.

List of tools:
BernzOmatic® Trigger Head, this is specifically used because it is one of the most inexpensive torches that can be used even upside down. It can be used with a Propane canister, or for much longer use periods, it can also be fitted with an adapter to fit it to a standard 20 pound propane tank.


A plumber's welding pad, this is used in between the pipe and torch and the workbench.
And a steel gas line pipe, preferably the silver galvanized steel type, the black pipe will mark the wood.
You will also need a piece of strap metal to attach the pipe on the workbench.

For the sake of storage I used a piece of 3/4" plywood as a base, about 18"x18". Place the plumber's welding pad, doubled up, on the 3/4" plywood. Screw in the metal strapping on one side through the padding. Screwing it down keeps it in place, and that is one less thing to worry about.

To make things a little more flexible don't screw down the other side of the strapping. Since you are going to be using varying sizes of pipes it is better to use a QuickGrip clamp to hold the other end of the strap to the welding pad. Just be sure to remove the pad off the clamp on the strap side, it will melt.

Set the selected sized pipe into the strap/pad and lock it down tight. The pipe should be at least 12" to 18" long and hang over the edge of the welding pad by 12". Connect the torch up making sure all connections are tight and there are no leaks, friction tape helps where needed. Set the flame to ultra low and place it inside the pipe. Make sure the flame doesn't go out, the flame needs air and a flow pattern. Make sure it is channeled up the pipe.

Next is the wood. The wood should soak for about 20 minutes, depending, of course, on thickness. Don't over soak though or the cohesion of the wood fibers will start to break down. Also the wood should be over cut by a couple inches so that you have wood to hold without getting too close to the pipe. Also a solid strap can be used to hold the wood but if you use a strap pay close attention as the water starts to boil out of the wood. See what I am talking about in a couple paragraphs.

After the soaking of the wood, start up the torch and get it set up. I added a couple raised screws to create a path way for the propane hose can help keep the torch placed in the right spot and to keep it from moving. Drip a couple drops of water on the pipe to test the temperature. The water should boil off but still cling to the pipe. The pipe shouldn't be so hot that the water sizzles off the pipe without really adhering to the side.

Take the wood and place it over the pipe. Hold it against the pipe until you can see the water boiling out of the wood. After it starts to boil out you can removed the wood and start to bend the wood. The wood takes on a more elastic form and after the wood cools the fibers will "harden" to hold its new shape. It is a good idea to have a form set up in advance to give the wood a set state in which to cool in. After the wood cools it should keep its form with little or no spring back.

Practice and enjoy just make sure you well ventilate the room and keep the flame as low as possible.

LQQK

Sunday, February 3, 2008

Home Built Cyclone for wood dust collection

Ok, this is the first posting here, lets see how this latest drip into the pool of Internet abuse goes.

Materials List
Cutting Section
Assembly

This dust collection cyclone is a great fit for a small to medium shop, for light to even heavy use. Although, of course, the more you use it the more you are going to have to empty out the collection bin, and the filtration bag.

The cyclone can be powered by either a 1.5HP engine (generally for smaller shops) or a 2HP engine or higher for larger shops, depends on the distance that the chips have to travel. Links to recommended engines are in the materials section (www.Grizzly.com)

First, I'll post a link to where you can down the SketchUp model for the cyclone planes and a listing of the materials you'll need. Second, a break down on its construction. You need to cut a little slack in the construction department. I made this cyclone about 4 years ago after seeing a picture of one in an ad, and from the picture and a little imagination I came up with the drawings, then later on converted the drawings to a SketchUp model. It has been going strong ever since.

SketchUp model can be accessed from here.
SketchUp is required to view the complete plans. Google provides an evaluation copy of SketchUp for free, but be warned, it is addicting once you start using it, and the registered copy is not cheap. But on the lucky side I haven't seen an issue other than "EXPIRED" in the title bar.


Materials List (all materials are available from Lowes or Home Depot, except of course the engine):

1) 1.5HP or for medium sized shop a 2+HP Dust Collection engine (Grizzly 1028Z (1.5HP) or Grizzly 1029Z (2HP 220V) Dust Collector)
1) 1/2 roll of 20" Galvanized Steel Flashing, aluminum flashing really doesn't have the structural strength to hold up to the vacuum or to the flying wood chips
1) 3/4"x 4'x8' MDF
1) tube of silicone sealant
2) large handful of wide, but small aluminum rivets
14) 3/8" T-nuts
14) 3/8" washers
14) 3/8"x1 1/2" bolts
2) large handfuls of 3/8"or 1/2" machine screws, pan head type, do not use self tapping screws
1) small handful of 1/2" machine screws, flat head type
1) 2' section of 2"x4", for french cleat
1) 6" flange section of duct
1) 33 gal. trash can, with a linking lid
1) small handful of 3" drywall screws
1) large handful of 1 5/8" drywall screws


Cutting Section:

First start to work on one sheet of MDF. The first cut should be to divide it into half so you have 2 4'x4' pieces. (If your sheets are shy a little that's ok, the back is 21 1/2" so you can have one side shorter.) You then want to cut one of the 4'x4' sheets in half and half again, so you end up with 4 pieces that are 24"x24".

Start off by making the top and bottom platforms. Take two 24" pieces and stack them. Draw an X from corner to corner to find the center. Predrill and screw in 3 to 4 1-5/8" drywall screws a little shy of 3" from the center mark, and drill a small hole straight through both sheets on the center mark. Draw a line to divide (bisect) the 24" square into equal 12"x24" rectangles then, using a trammel or pencil on string, make a 24" arc rounding one of the 12"x24" rectangles leaving the square end alone. Using a band saw or jig saw cut the corners off on the measured arc.

Remove the screws holding the semi rounded 24" squares and measure a 3"radius (for a 6"hole) on one piece and a 10" radius (for an 20" hole) on the other, both from the center hole. Cut out both holes with a jig saw making starting holes with a drill first. Write a #1 on the one with the 6" hole and #2 on the one with the 20" hole. That is the way I will refer to them during the Assembly portion.

Just in case you are getting better the second time of cutting straight circles out of MDF, take a new piece of 24" square board and draw 3 circles from the center, one 6" wide (3" radius), one 19 7/8"(maybe closer to 19 15/16") wide (9 15/16" radius), and the last one 22" wide (11" radius). Again use a small to medium sized drill bit several times to make a starting point for the jig saw blade. You should end up with a 6" disc (which can be tossed), a circle just under 20" with a 6" hole in the middle (Refer. #3), and a 2" ring with an 20" I.D. (maybe a little more) and a 22" O.D. (Refer. #4).

The back is the simplest, a 24"x 21 1/2" rectangle (Refer. #5). The last piece of MDF (12"x20") that is to be cut doesn't need to be dealt with until the end (Refer. #6). But at this point you should have gone through about half a sheet of MDF.

Ok, it is steel cutting time. PLEASE BE EXTREMELY CAREFUL WHEN CUTTING THIS. USE GOOD LEATHER GLOVES AND SHARP TIN SNIPS. MARK EVERYTHING FIRST WITH A SHARPIE AND WHEN YOU ARE DONE CUTTING USE A FILE TO REMOVE BURRS AND SHARP EDGES, BUT ALWAYS USE GLOVES. Roll out the galvanized steel flashing and put it upside down so that it doesn't roll up on you. Measure out about 64" and roll it around the #3 piece of MDF. There should be enough to wrap around the piece with over an inch to spare, this will provide ample riveting area and sealant area. Set this aside in a safe spot away from people, animals, and other stupidity.

Next cut a cone shape out of the flashing. This is a lot trickery. The angle is about 155 degrees or 25 degrees off vertical. The sides should be about 18 1/2" on the angle, the bottom should be about 5 3/4" across (I'll explain why 5 3/4" and not 6" in the Assembly portion, and in the next paragraph), and the top of the cone should be about 21" (again see Assembly portion). The cone with the 5 3/4" hole should measure approximately 16 1/2" tall. Remember to leave about an inch extra when you mark the cone's side edge to allow adequate riveting and sealant room.

After the cone is cut out lay the sheet metal out on a workbench. Measure an arc 1" down from the top arc and another 1" up from the bottom arc with a Sharpie. Cut 1/2" to 1" wide tangs up to the Sharpie line. These tangs will allow the cone to be attached to both the 6" flange connector on the bottom and the 22" ring on top.

Now hopefully your fingers aren't sliced to ribbons and you were a good little woodworker and wore heavy gloves while working with the sheet metal. Now it is time for the assembly!


Assembly: Refer to SketchUp model for placement and visual aid in connecting parts.

First part is to attach piece #1 and piece #5 along the 24" sides. Use 1 5/8" drywall screws (at least 6) and yellow glue to attach the #1 to the top side of #5, don't forget to predrill the holes.

Take piece #3 and clamp it to the underside of piece #1 so the the two 6" hole are aligned. Drill 6 holes at equal angles and distance (preferably about 1" to 2" from the rim of the 20" disc) through both pieces #3 and #1. Set t-nuts into the holes in piece #1.

Take the 64"x20" piece of flashing and curve it in an approximate 20" cylinder and cut out an elongated tear drop shape to allow the 6"duct to enter into the finished cylinder. With a smaller tear drop shape you can always cut away more and reshape, so be conservative until the 20" cylinder is formed in the next step. The tear drop shape is so that when the 6" inlet duct is placed in it will follow the curved section in the back of the cylinder.

Take piece #3 and wrap the 64"x 20" flashing segment around it, clamps help. Drill holes in the flashing to accommodate the 1/2" machine screws, one about every 4" to 6" on both top and bottom. Attach the flashing to piece #3 adding one screw at a time and sealing with silicone sealant until the flashing is completely wrapped in a 20" cylinder.

Take piece #2 and work the 20" cylinder into the 20" hole, file if needed with a rasp, fill gaps and seal the rest of the cylinder against the piece #2 with silicone. Use 1/2" pan head screws to secure it in the MDF just like around #3.

Drill rivet holes through the overlap of the sheet metal about every 2" to 3" and use silicone to seal, then use rivets to help seal it off permanently. Then cut a section of 6" circular steel duct about 18" to 19" long. Drill at least 8 machine screw sized holes in the duct about 1/2" from one end. Screw and seal into the 6" hole in piece #3.

Cut another 20" section of the 6" duct and attempt to place it into the hole in the 20" cylinder created by the tear drop cut. Modify the tear drop opening to accommodate the inlet duct. Cut the inlet pipe leaving about 2" in the inside of the cylinder so tangs it can be cut to rivet and seal the inlet pipe to the cylinder.

Next attach the 20" cylinder section to pieces #1 and #5 with 6 1-1/2" long 3/8" bolts and washers, then screw in piece #2 to piece #5. And with that the top section is pretty much complete.

Form the cone using clamps to hold the shape. Drill holes for the rivets about every 2" to 3" and seal with silicone. Bend the tangs down on the large side of the cone and fit to piece #4, the 22" ring. Drill holes in the tangs, about every fourth tang will do, for flat head screws and seal with silicone. Align the cone and ring with the bottom of the main section and drill 8 3/8" holes, fit in t-nuts, and attach with 1-1/2" long 3/8" bolts and washers.

Drill rivet holes in the 6" flange connect and connect and seal to the now "bottom" (small hole) of the cone.

Attach a french cleat on to the back top of piece #5 with at least 10 screws, and a 2"x4" block to the bottom. Then you are set to attach to the wall.

Before placing the engine on top of the cyclone test that the cyclone will hold the weight and if all is good place the engine on top of the cyclone and attach the bag unit, the bottom 6" pipe, and trash can with a 6" hole. Seal up any leaks with silicone put make sure you can remove the pipe on the bottom of the cone to allow chip disposal.

LQQK